

Smooth idle with sputtering during acceleration often points toward a fault that appears under load. Ignition, fuel delivery, air/load measurement or an exhaust restriction are possible paths. A transmission shudder or mount movement can feel similar without being the same combustion problem.
Describe the event first: does the engine stumble, RPM rise without matching speed, the body shudder or drive cut out? Record temperature, speed/gear, recent refueling and repairs. Stop safely for severe misfire with a flashing engine light, loss of drive, overheating or fuel leakage.
Read relevant stored and pending faults and preserve freeze-frame information. Normal idle does not clear the engine, and a code identifies a diagnostic direction rather than a part to replace.
What Details Help Narrow An Acceleration Fault?
Note whether hesitation begins immediately as the pedal moves or only under greater load. Distinguish cold-only behavior, a fault after refueling and a problem that began after intake or fuel-system work. These differences help choose the next measurement.
Do not repeat hard acceleration to prove the complaint. A technician can reproduce relevant conditions safely with appropriate diagnostic equipment. If shaking occurs mainly at a stop, compare idle vibration instead.
Which Causes Need Different Checks?
1. Plug Condition Or A Misfire Cause


Load can expose an ignition problem that is less apparent at idle. Check relevant cylinders, plug specification, condition and the wider ignition/fuel/mechanical findings. Wet or dark deposits do not all have the same cause.
A universal resistance range and absence of a short do not prove firing under cylinder pressure. Do not soak plugs in brake cleaner or wire-brush delicate electrodes as a general fix. Use the appropriate service method and correct parts.
2. Coil, Boot, Lead Or Connection Fault


Greater cylinder pressure can increase ignition voltage demand. Check the fitted arrangement rather than assuming hesitation simply means the coil cannot produce enough rapid sparks. NGK describes the coil, boot and plug as one high-voltage circuit.
A controlled swap of compatible components may help isolate a fault, but interpret the complete result. Do not run with a removed coil to look for stumbling. That can introduce misfire, high-voltage and catalyst risks.
3. Air/Fuel Feedback Or Sensor Circuit

Interpret exhaust feedback with fuel trims, intake/exhaust leaks and misfire data. Extra oxygen can reflect a real combustion problem; it does not automatically prove the sensor failed. Sensor count and upstream/downstream roles vary by vehicle.
DENSO explains different lambda-sensor technologies. A universal 150–850-millivolt switching test is not valid for every wideband or narrowband sensor and operating state. Do not probe guessed wires.
4. Air Measurement And Intake Integrity

Compare airflow/load readings with the actual operating conditions. Check supply, ground, connectors and the intake path as relevant. Some engines use MAF, MAP or both, and not every airflow meter uses the same heated-wire voltage signal.
Delphi’s digital-MAF test example illustrates why design-specific diagnosis matters. One 1.0/1.7-volt rule does not cover all systems. Cleaning should only follow the approved method; touching sensing elements can cause damage.
5. Throttle Or Pedal-Control Response

Compare requested and actual throttle response, relevant faults and intake condition. A mechanical cable and an electronic actuator need different checks. Do not force an electronic plate or assume every visible deposit requires cleaning.
Use the correct cleaning and relearn procedure where supported. A throttle code can involve its circuit or another input; a generic cleaner is not a diagnosis.
6. Crankshaft Signal Or Related Circuit

A signal dropout, damaged wiring or trigger problem can affect timing information. Check the actual waveform and related data under relevant conditions before replacing the sensor. A multimeter alone does not establish the complete dynamic waveform.
Delphi demonstrates using application information, electrical checks and an oscilloscope. Replacement fit, clearance and any required learning depend on the vehicle.
7. Injector Flow, Leakage Or Command
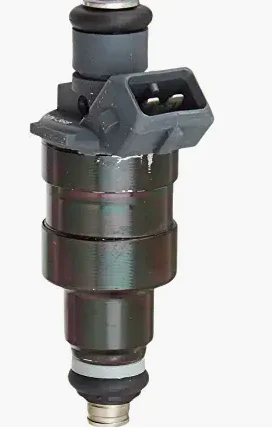

Check pressure stages, command and cylinder contribution as indicated. A clicking sound or correct coil resistance does not prove correct flow. Injector designs do not all share a thirty-ohm specification.
An “OL” meter indication is not automatically a short. Do not energize exposed injectors from a loose battery or inspect spray with a pressurized rail out of place. Use the specified depressurization, equipment and sealing procedure.
8. Fuel Supply Under Load
A supply problem may appear when demand increases. Check the applicable low/high-pressure stages, command, electrical supply and delivery before blaming the pump. Low pressure can also involve a restriction, regulator/control issue or another cause.
Not every pump is fully submerged at all times, and one-quarter tank is not a universal dry-running threshold. Follow the vehicle’s fuel guidance. Filter location and serviceability vary; do not replace a module simply from a guessed pressure verdict.
9. Intake, Purge Or Ventilation Leakage
Unintended airflow can disturb mixture control, but its effect changes with engine design and conditions. An intake gasket may seal the manifold to the cylinder head, not universally the engine block. Inspect the actual hoses, joints and relevant circuits.
Use an approved leak test and compare mixture data. Do not spray flammable cleaner around a running engine to provoke an RPM change. A hissing noise alone does not locate or prove the leak.
10. Exhaust Restriction

A restriction can limit performance under load. It may involve a converter or another exhaust component. A catalyst-efficiency code such as P0420 does not by itself prove blockage.
Walker separates engine/exhaust faults, converter temperature and backpressure checks. A large inlet/outlet temperature difference alone is not a blockage verdict. Avoid working under an unsupported car or handling a hot exhaust. Correct the underlying cause if converter damage is confirmed.
11. Mount Movement Or Contact

A mount can allow excessive movement or component contact during torque changes. It does not generally explain sputtering by shaking sensors into incorrect readings. Distinguish body vibration from uneven combustion.
Do not use rapid revving or casual brake-loaded gear shifts with someone watching from an unsafe position. Follow the controlled inspection and support procedure for the vehicle.
12. Transmission Or Clutch Slip
RPM rising without matching acceleration needs a different diagnosis from engine misfire. Transmission designs vary; not all have torque converters, bands or a conventional dipstick. A symptom alone does not identify worn friction parts.
Use actual faults, operating data and the exact fluid specification/level procedure. Do not apply a universal engine-off dipstick check or flush based only on dark color. Avoid repeated slipping tests that can increase damage.
What Confirms The Correct Repair?
Recheck the original operating conditions with suitable data, no warning lights and normal acceleration. Do not substitute high-octane fuel, additives or a collection of replacement parts for identifying the fault.
Experiences With Acceleration Hesitation
These examples involve different repair paths. Match the actual symptom and findings instead of assuming smooth idle clears every system.
My 2016 Ford Fusion had a similar problem. It idled okay but would hesitate and sputter when I tried to accelerate. After some research, I learned that the spark plugs could be the culprit. I checked them and found they were worn out. I replaced the spark plugs and ignition coils, and the car’s acceleration improved quite a lot.
I drive a 2013 Chevrolet Cruze. It started to hesitate during acceleration, though idling was fine. The check engine light came on, so I used a code reader and found a P0300 code, indicating a misfire. I replaced the spark plugs and ignition coils, but the issue was actually a clogged fuel injector. After cleaning the fuel injectors, the car accelerated smoothly again.
I had a 2012 Volkswagen Jetta that ran smoothly at idle but sputtered on acceleration. After some troubleshooting, I discovered that the oxygen sensor was malfunctioning, sending incorrect data to the ECU and causing the fuel mixture to be off. Replacing the oxygen sensor fixed the issue, and the Jetta’s performance returned to normal.
I drive a 2019 Kia Sorento which started to struggle on acceleration. The car would idle perfectly, but as soon as I pressed the gas pedal, it would hesitate and jerk. A mechanic checked and found that the catalytic converter was partially blocked. This was affecting the exhaust flow. Mechanic replaced the catalytic converter and the Sorento’s acceleration became smooth again.
Join The Conversation.
No comments yet. Comments are moderated before publication.