Car Sputters When Air Conditioner Is On: 10 Potential Causes
The car’s engine may sputter when the air conditioner turns on, showing the A/C compressor could be overloading the engine. Such overloading can exacerbate existing problems in the alternator, battery, or idle air control valve (IACV). When overloaded, RPMs can drop, causing vibrations or near-stalling when idling or braking. Possible solutions include testing the charging system, fixing or replacing the IACV, checking for intake vacuum leaks, cleaning the throttle body and EGR valve, replacing worn belts/pulleys, confirming refrigerant pressure, re-examining engine mounts, and inspecting ignition parts.
Buckle up and get your AC on – it’s time to beat the heat! But what if your car starts sputtering when you crank up the cold air? Major bummer. In this guide, we’ll troubleshoot why your car shakes when you turn on the AC.
Note: Car AC system has a very important component called AC clutch. Understanding its components and working will help you troubleshooting car feeling bogged down when ac is on. So, make sure to read my guide on that topic as well.
Here is another video recorded by the user in which you can see car stalls as soon as ac was turned on:
For you guys, I’ve developed an interactive tool to aid in car trouble diagnosis. It walks you through straightforward steps.
Do you know your car may also lose power when turning. Make sure you read my guide on that topic as well.
- Turning on AC adds extra load on engine which can reveal underlying issues
- Common causes include faulty idle air valve, bad ignition parts, low refrigerant, dirty throttle body
- Compressor seizing when engaged strains engine, causing sputtering
- Weak charging system forces battery to work harder to supply AC components
- Worn mounts transfer extra vibration to chassis instead of damping it
What is My Personal Experience With Engine Hesitating When AC Activated?
Once, my 2001 Honda Civic started sputtering badly whenever I turned on the AC. After some testing, I diagnosed a failing ignition coil that was struggling to deliver adequate spark under the AC’s extra load.
I replaced all four coils and spark plugs with quality components. The shaking immediately stopped and the Civic ran smooth once again, even on the hottest days with AC blasting. Proper maintenance and diagnosis saved me an expensive repair bill and got my car back to normal.
If your car shakes at idle but runs smoothly when driving, it can have some issues. You can read my guide on that topic.
What Are the Causes of Inconsistent Engine Performance When Using Car AC?
Let’s discuss several causes that lead to car shaking and stalling when AC is on:
1. Faulty Idle Speed Control Valve Causes Rough Idling When AC Engaged
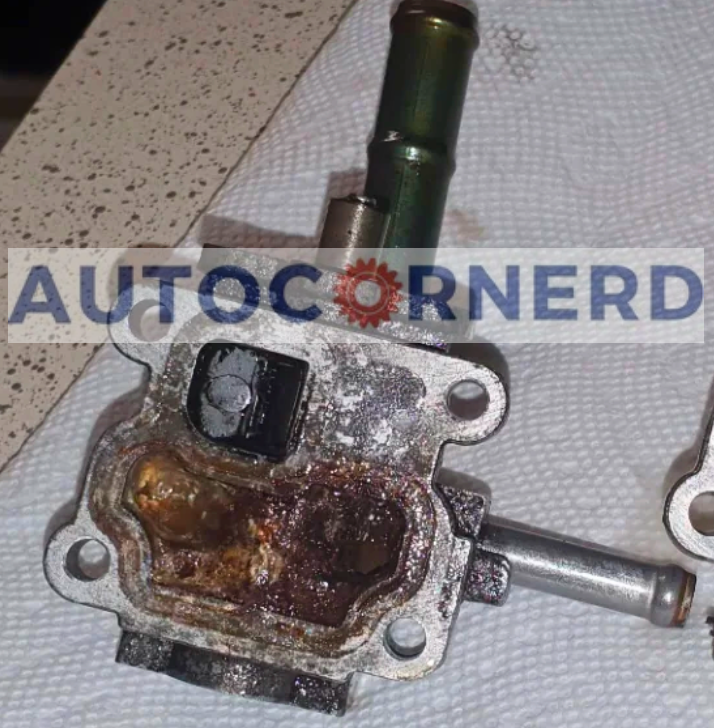
The IAC is a valve that regulates the amount of air bypassing the throttle plate in the air intake when the engine is idling.
IACV is controlled by the engine computer and helps maintain proper idle speed. When closed, it reduces the amount of air getting into the engine. When open, it allows more air to get to the engine.
Opening and closing the valve continually helps keep the engine idling smoothly at the correct RPM.
In essence, here is how ECU controls IACV:
- The engine computer monitors engine sensors like coolant temperature, oxygen levels, throttle position etc.
- Based on this data, it calculates the target idle RPM and signals the IAC to open or close to reach that target.
- Common target idle RPM is around 600-800. Higher when cold, lower when warm.
- The IAC has an electric motor that moves a pintle valve to precisely meter air.
How IACV Becomes Bad?
Carbon buildup, contamination and wear can make the IAC valve stick or not fully close. This allows too much air into the engine, causing high idling RPMs and sputtering. If it sticks fully closed, it cuts off air and causes the engine to stall out.
Why Does the AC Affect Idling with a Bad IAC?
- When the AC compressor kicks on, it puts an extra load on the engine.
- This load reduces the idle RPM.
- The computer senses the RPM drop and signals the IAC to open more to compensate.
- If the IAC is stuck open already, it cannot open further to raise RPMs.
- This results in sputtering, shakes and a rougher idle.
How can you diagnose a faulty IAC valve?
Let’s walk through some troubleshooting steps to check a bad IACV:
- First, scan for any trouble codes related to the idle system. Codes like P0505, P0506, or P0507 point to issues with the IAC valve or idle air control valve. Knowing the specific code can help narrow down where the problem lies. You can use BlueDriver scan tool.
- Next, inspect the valve itself. Look for any obvious damage like cracks, loose connectors, or corrosion. Also check for gunk buildup which can stick the valve and disrupt operation. A clean IAC is a happy IAC.
- With the engine off, have a helper crank the key to “run” while you listen to the valve. It should click rapidly as it cycles. No clicking could mean a busted IAC.
- After that, start the engine and unplug the ECU’s IACV connector. If the RPMs surge up to 2200-2500, that shows the ECU and IAC motor are working normally. Any other reaction points to issues.
You can watch following Youtube video to test IAC valve:
How to fix?
If your IAC valve is dirty or damaged, you may be able to fix it by cleaning it or replacing it. To clean your IAC valve, you will need some carburetor cleaner, a rag, and a screwdriver.
You will have to remove your IAC valve from your throttle body and spray some cleaner on its pintle (the part that moves in and out) and its passages.
Then wipe off any excess cleaner with a rag and reinstall your IAC valve.
Do note the following things while cleaning IACV:
- Ensure pintle valve moves freely after drying
- Double check all electrical contacts are clean
- Check for related vacuum leaks during cleaning
- Reset ECU adaptive memory or do idle relearn after installing IACV
To replace your IAC valve, you will need a new one that matches your vehicle’s make and model.
2. AC Compressor Clutch Seizing When Engaged Can Stall Engine Operation
AC compressor is the lifeblood of your car’s cooling system. This critical component pressurizes refrigerant to provide that frosty blast of air we rely on for relief from summer heat.
The compressor is powered by an electromagnetic clutch that engages when you flip the AC switch on. This clutch meshes with the pulley on the compressor, turning the shaft so refrigerant can be squeezed and circulated.
The AC clutch can sometimes start to stick and slip when engaged. Like a faulty starter motor, this sticky situation prevents smooth compressor operation. Ignoring signs of a balky AC clutch can snowball into bigger issues:
- Belt Squeal: As the clutch sputters trying to turn due to binding, it causes the belt to slip and squeal loudly. This squealing noise tends to come and go as the clutch temporarily binds then releases.
- Engine Struggle: The added drag on the engine from the seized clutch can make the engine struggle or even stall out entirely.
- Overheating: Friction from the stuck clutch heats up the compressor and AC system, potentially leading to failure of the compressor or other components.
- Excess Wear: The intermittent sticking puts strain on the clutch components and bearings as well as the belt, pulleys, tensioner and engine accessories. This can lead to premature wear or failure.
- Lack of Cold Air: Periods where the clutch cannot turn due to seizing mean the compressor cycles on and off, providing inconsistent or warm airflow into the cabin.
Why AC compressor clutch binds?
- Worn AC Clutch Bearings: Bearings allow smooth rotation of the AC compressor pulley When they wear out, the clutch binds up intermittently.
- Low Refrigerant: Not enough refrigerant oil to properly lubricate the system or loss of refrigerant pressure can allow clutch components to stick and bind.
- Overcharged Refrigerant: If the refrigerant is overcharged, it can cause the compressor to work harder which will cause additional strain on the engine. This will result in unstable engine RPM when ac is on.
How to diagnose the problem?
- Check for signs of oil leaks, damaged connectors or loose wiring related to the clutch. Any signs of rubbing or damage around the clutch pulley can indicate binding issues.
- Inspect the belt condition for any glazing effects and test the belt tensioner for smooth operation. A worn belt that slips or a stuck tensioner could mimic compressor clutch seizure.
- Feel along the belt path while an assistant turns the AC on and off. See if you can detect any binding feeling in the section that leads to the compressor clutch.
- Listen for any squealing or squeaking noises from the belt with the AC on, indicating slippage from resistance.
Here is how to test compressor pulley:
- With the engine off, remove or loosen the serpentine belt. This isolates the compressor pulley from the engine.
- Try to spin the clutch pulley by hand. It should rotate completely freely with no resistance or grinding noises.
- If the pulley spins freely, the issue is likely inside the compressor. If the pulley barely spins or doesn’t rotate smoothly, the pulley bearing is likely worn out.
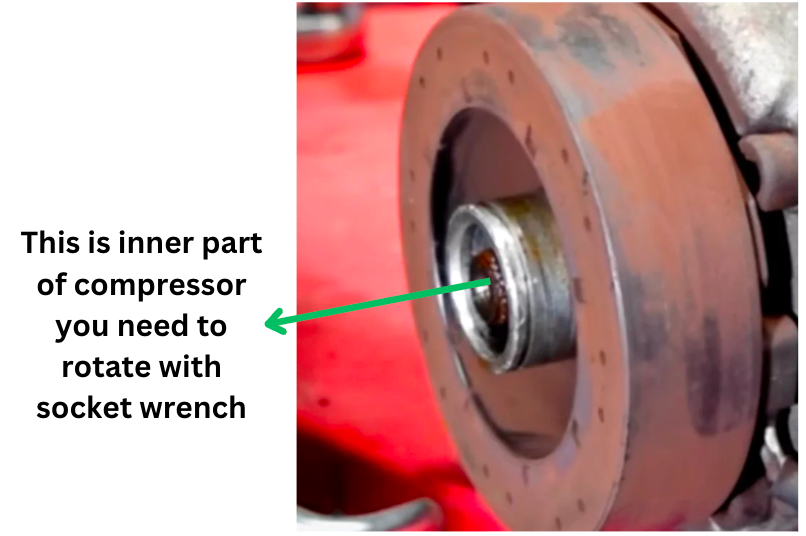
- If the pulley spins freely, test the compressor by trying to move it with a locking oil filter wrench. If the clutch doesn’t move, the compressor is likely damaged. I have provided an image below for understanding:
3. Weak Ignition Coils or Aged Spark Plugs Reduce Combustion Efficiency
The ignition system delivers electric sparks to ignite the air and fuel mixture in the cylinders so the engine can run. When this vital system is faulty, your engine can misfire and struggle, especially when extra strain is put on it.
For example, when the AC compressor switches on, it places more load on the engine to produce the extra power needed to run it. This means the ignition has to fire harder to keep up. If the ignition components are weak, the spark plugs may not get enough voltage to make a robust spark.
A misfire takes place if a spark plug fails to ignite the mixture in one or more cylinders. This causes a loss of power and rough idle as the engine hesitates. A weak spark happens when the plugs produce low-intensity sparks that don’t fully combust the air/fuel blend. This leads to incomplete burning and reduces the engine’s efficiency.
Some old vehicles have separate ignition control modules that also become bad and show certain symptoms. You can read my guide on that topic.
Why do ignition coils become bad?
Ignition coils act as transformers, taking the lower voltage from the battery and converting it to the thousands of volts needed to jump the spark plug gap to ignite the mixture in the cylinder.
As coils weaken over time from heat cycling, internal arcing, and normal wear, they lose the ability to deliver adequate voltage to the spark plugs to maintain a consistent spark.
This weakness shows up most when the ignition system is under greater strain. Turning on the AC adds load to the engine both mechanically through the compressor itself which the engine must turn against resistance, and electrically as the AC blower fan motors draw additional current.
More voltage and spark energy is needed from the coils under these greater demands. Weak coils cannot deliver, resulting in misfires.
Do you know that check engine light can also start flashing if misfire occurs. So keep an eye on dashboard of your vehicle.
Ignition coils and spark plug wires (in case of coil packs) can also corrode, due to which sufficient voltage isn’t generated for spark delivery.
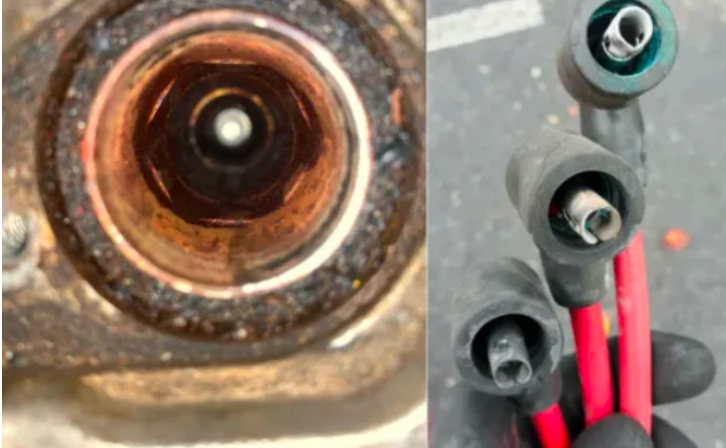
Fouled Spark Plugs
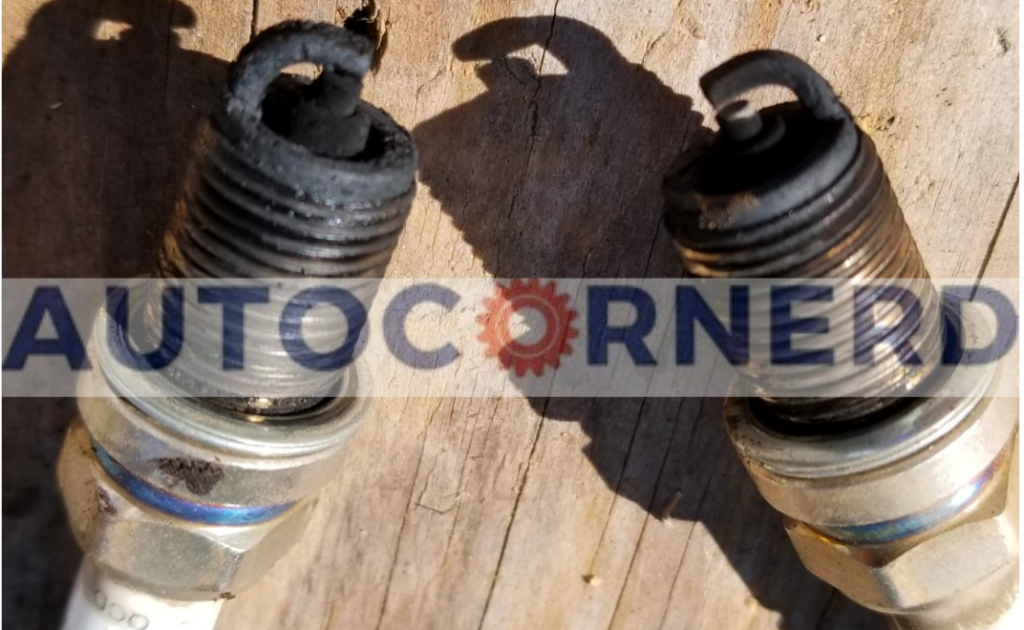
Spark plugs can become fouled due to oil leakage through valve stems, coolant leaking through head gasket and excessive fuel leakage through fuel injectors.
How to fix?
You can try cleaning the spark plugs using the wire brush and spark plug cleaner to carefully remove any carbon deposits or contaminants from the electrode. Ensure not to damage the electrode or insulator in the process.
First, use compressed air to clean off any dirt and debris. Then, keep the spark plug soaked in the brake cleaner till all the gunk on the spark plug is washed away.
4. Weak Charging System Exerts Load On Engine Idling During AC Cycling
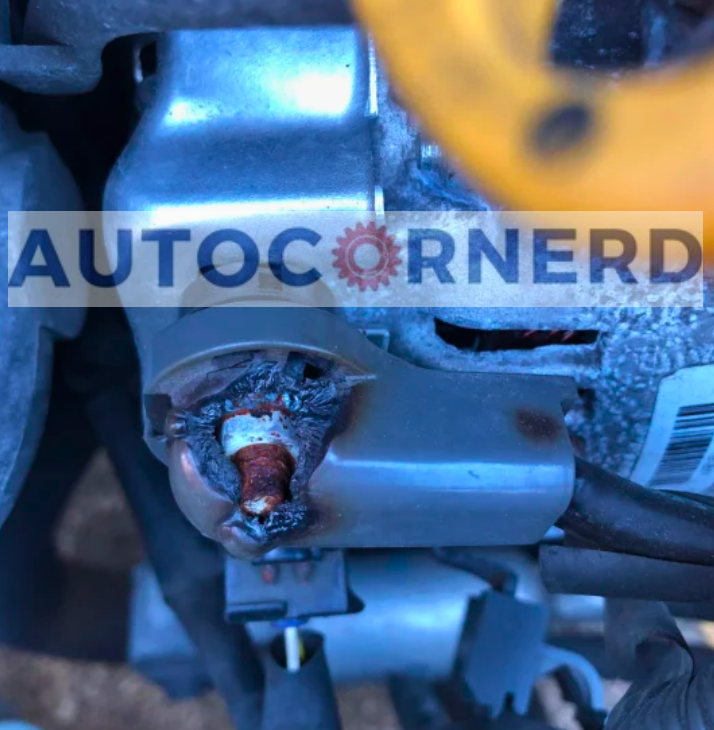
The battery helps start the engine. Then the alternator takes over to charge the battery and power all the electrical parts while driving. Both pieces have to work together.
If the alternator stops working or doesn’t make enough electricity, the battery has to fill in. This can make problems like the engine stutters, lights go dim, or everything stops when using a lot of energy.
How the Alternator Works and Fails?
Inside the alternator is a belt, some magnets, windings, diodes, and a voltage regulator. As the belt spins the magnets around, this makes electricity in the windings which the diodes turn into power to charge up the battery. The voltage regulator makes sure the charging stays steady.
There are two main ways an alternator can fail:
- Mechanical: The belt gets loose or the bearings wear out. This usually makes noise or squealing. Check for cracks, glazing, fraying.
- Electrical: Diodes, stator windings, or the voltage regulator go bad. Causes charging to be low or jump around.
Electrical faults are more common and can only be detected through testing, as the alternator may otherwise appear functioning.
To learn more, you can also read my guide on car keeps burning alternator.
Signs of Weak Alternator Output
Some signs your alternator may not be providing sufficient charge:
- Dimming headlights when idling, AC or other loads are turned on
- Battery not staying fully charged over time
- Voltage gauge reading under 13.5 volts with engine running
- Intermittent stalling, sputtering, weird electrical issues
Insufficient output causes the battery to become drained over time. This leads to performance problems.
Testing the Charging System
To diagnose, first load test the battery to see if it is holding a charge properly. If good, check alternator output:
- Use a multimeter to measure voltage across battery terminals with engine off (12.4 to 12.7V is normal)
- Start engine, rev slightly, check voltage again – should now read 13.5 to 14.5V
- Turn on all accessories (lights, AC, etc) – voltage should stay in range, not drop below ~13.5V.
How Insufficient Alternator Charging Leads to Car Shaking?
When the alternator cannot provide the voltage and current demanded by the vehicle electrical system, especially with added loads like AC, problems arise:
- Battery discharges faster to make up deficit
- Electronics may turn off or function intermittently
- Ignition and injectors may misfire due to low voltage
- Reduced power to spark plugs causes sputtering
How to fix?
To address weak charging issues:
- Replace damaged alternator components like diodes, stator, regulator as needed
- Check/tighten all connections to clean and ensure good contact
- Replace worn serpentine belt if slipping and not spinning rotor fully
- Install higher output alternator if car has added electrical loads
- Check installation alignments – proper alternator pulley alignment critical
5. Dirty Throttle Body Restricts Desired Airflow
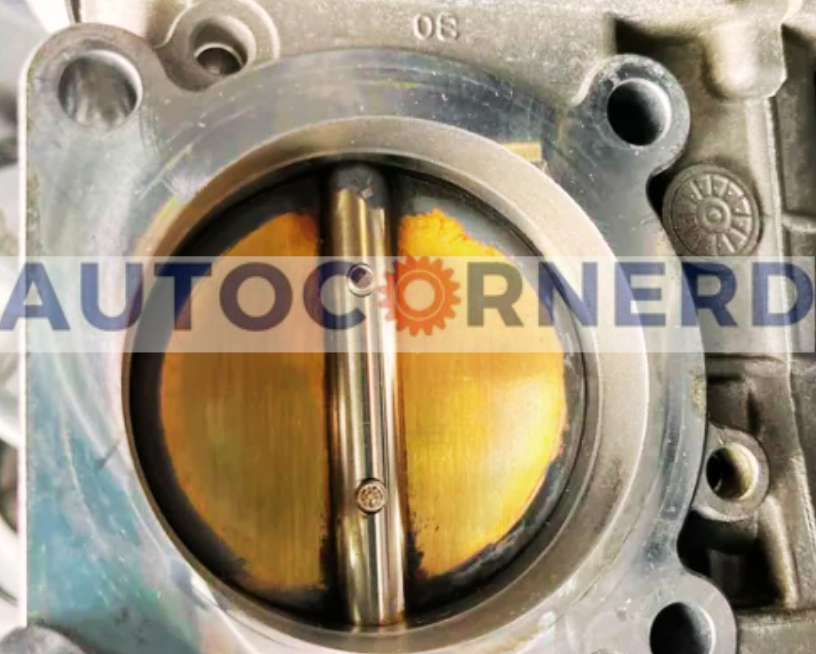
The throttle body is the gateway for air to enter the engine. Over time, grime and carbon can build up inside, disrupting the smooth flow. This dirtiness causes issues.
As deposits accumulate on the walls, less air can pass through. The butterfly valve also gets restricted. Its movement suffers. This imbalance in air supply affects performance.
Without enough air, the idle speed becomes shaky and unreliable. So when you turn on the AC, the unstable idle may cause car slugglish.
How to fix?
To address the problem, first inspect the throttle body. Check for any physical damage, wear, cracks, leaks or looseness. These can impact function.
Closely examine the throttle plate. Look for heavy carbon deposits that obstruct movement. See if it sticks or hesitates when moved by hand. This points to a mechanical issue.
Dirt and carbon accumulate over time, gradually reducing performance. Use a throttle body cleaner and soft brush to gently scrub away the buildup. This will clean things up.
6. Refrigerant Is Overcharged or Undercharged Affecting AC Performance
The refrigerant in a car’s air conditioning system is vital for proper operation and cooling performance.
Both undercharging and overcharging the system with refrigerant can lead to issues like the AC compressor cycling on and off, reduced cooling capacity, and even engine starts jerking when the AC turns on.
There are several reasons why the refrigerant charge level needs to be precisely calibrated.
Causes of Incorrect Refrigerant Charge
There are a few common causes of low and high refrigerant levels:
- Refrigerant leaks: Small leaks over time will lead to low refrigerant. Finding and repairing leaks is crucial.
- Improper recharging: Using DIY refrigerant cans often overcharges the system since the exact amount added is unknown.
- Normal wear: Older components like seals and o-rings will eventually leak refrigerant.
What exactly is compressor cycling?
The AC compressor is the pump that circulates refrigerant through the system. Both low and high refrigerant charges can cause the compressor to rapidly cycle on and off.
Here’s why:
- Low refrigerant: The low pressure safety switch disables the compressor to protect it when pressure drops too low. This causes the compressor to turn off repeatedly.
- High refrigerant: The high pressure safety switch turns off the compressor when head pressure gets too high. This also leads to short cycling as refrigerant backs up.
If AC is low on refigerant and short cycling, it prevents the PCM from relearning new AC on idle trim settings, causing idle sag when AC kicks on/off.
How it would cause engine hesitating when AC is on?
One of the most noticeable symptoms of AC issues is the engine stumbling when the AC compressor engages. There are a couple reasons this can happen:
- AC load: The AC compressor places an extra load on the engine when it turns on. If refrigerant levels are off, it strains the compressor and overworks the engine.
- Idle control: The AC idle speed may need to be relearned if refrigerant levels change. Low refrigerant can prevent this, causing a low idle when AC is on.
How to diagnose and fix?
Since DIY refrigerant recharging often causes issues, the best approach is to have an experienced AC technician handle diagnosis and repairs:
- Use professional gauges: DIY gauges are often inaccurate. Pro-level gauges provide precise refrigerant pressure readings needed for diagnosis.
- Leak test: Dye and UV lights should be used to check for any refrigerant leaks that must be addressed.
- Evacuate and recharge: The AC system needs to be fully evacuated to remove all refrigerant, moisture, and contaminants before recharging.
- Charge by weight: Refrigerant should be added by exact weight, not estimation. This avoids over or under-charging.
Note: The ideal low-side and high-side pressures for a car AC system are 25-30 psi and 200-250 psi respectively.
7. Bad AC Condenser Exerts Strain On Compressor
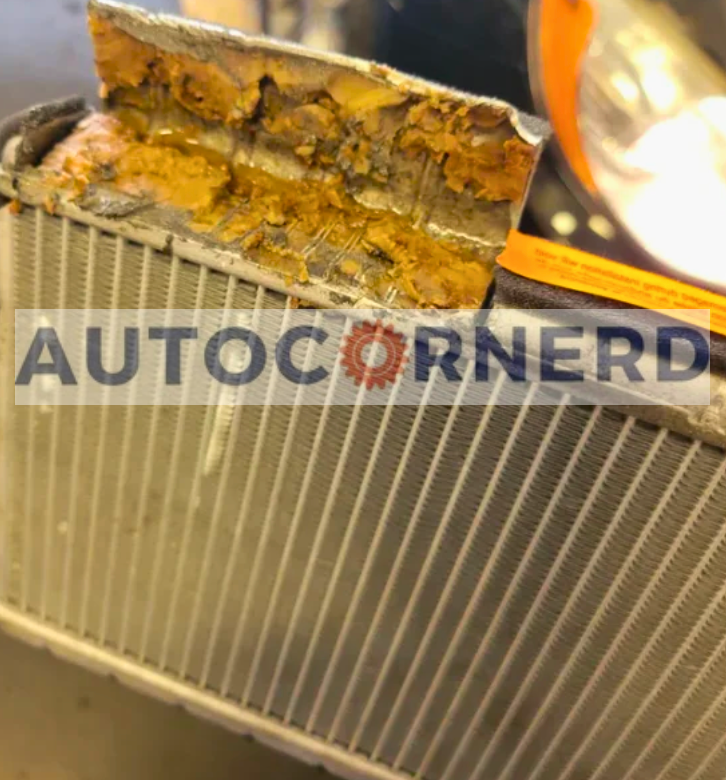
The AC condenser is a radiator-like component located at the front of the car, usually between the radiator and the engine cooling fan. Its job is to remove heat from the hot, pressurized refrigerant gas coming from the compressor.
It does this by circulating outside air over finned tubing containing the refrigerant, cooling the gas and condensing it into a liquid.
Some key points about the condenser:
- Made of finned tubes with good heat transfer properties to maximize cooling
- Refrigerant goes in as a hot gas, exits as a pressurized liquid
- Condenser has a receiver/drier to collect the liquid refrigerant
- Needs good airflow anytime AC is on to work efficiently
- Prone to damage from road debris due to front location
- Can get internally clogged over time
How a Failing Condenser Disrupts the AC System?
When the condenser fails or gets blocked, it can no longer properly remove heat and condense the refrigerant gas into a liquid. This causes high pressures in the system since the compressor keeps pumping out hot gas that can’t convert to liquid form.
The high pressures place extra load on the compressor, forcing it to work much harder. This can cause the engine and belts to lag, resulting in car trembling as the compressor struggles.
Some specific effects of a bad condenser include:
- Refrigerant not fully condensing leads to reduced cooling capacity
- Excessive compressor cycling due to high head pressures
- Higher risk of compressor failure due to overwork
Essentially, the condenser is unable to do its job, resulting in poor AC performance and strain on the compressor and engine. This manifests as choppy idle or even stalling when the AC is switched on and the compressor kicks in.
Condenser Failure Modes
Car ac condensers can fail due to a variety of modes. Common ones include:
- Refrigerant leaks: Small leaks becoming large over time
- Structural damage: Fins bent, tubes crushed by debris
- Clogged tubes: Dirt and debris blocking interior passages
- Corrosion: Refrigerant acids and moisture eroding tubing
- Failed fan: Fan not spinning to provide adequate airflow
- Uneven condensation: Indicates some tubes not functioning
- Blocked exterior: Bugs, leaves, mud blocking airflow
Note 1: Low pressure side of car AC system is between evaporator and compressor. The high-side pressure port is located between compressor and condenser.
Note: 2: In blockage testing of condenser, you would simply bring your fingers close to the condenser. If you feel hot air flow through the condenser fins, it means condenser is fine. If you don’t feel any airflow, it means condenser is clogged.
8. Clogged EGR Valve Affects Fuel Consumption
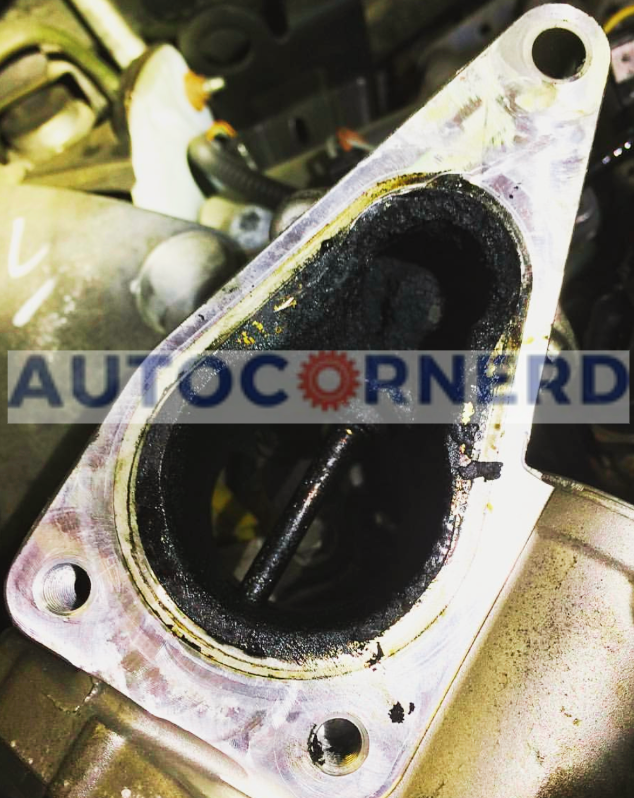
The EGR valve, or Exhaust Gas Recirculation valve, is an emissions control device found on most modern internal combustion engines.
Its purpose is to recirculate a portion of the exhaust gases back into the combustion chamber. This has the effect of lowering combustion temperatures and reducing the formation of NOx emissions.
Some key points about how the EGR valve functions:
- It opens at specific times to allow exhaust gas to enter the intake manifold and mix with the incoming air/fuel mixture. This lowers combustion temperatures.
- The EGR valve is controlled either by vacuum, backpressure, or electronically by the vehicle’s computer. It does not stay open continuously.
- Opening the EGR valve lowers combustion efficiency slightly. The computer adjusts fuel trim to compensate when the EGR is active.
- EGR is usually active at idle, light load and cruising conditions. It is deactivated under hard acceleration for maximum performance as high loads need maximum oxygen.
How the EGR Valve Can Become Clogged?
Over time, carbon deposits can build up inside the EGR valve assembly and associated intake passages. This is caused by the following factors:
- Soot and combustion byproducts circulating through the system
- Oil vapors condensing inside the intake, exacerbated by oil leaks
- Short driving trips without sufficient warm-up time to clear deposits
- Stop-and-go driving that generates significant exhaust soot
How a Clogged EGR Valve Makes Car Feel Bogged Down When AC is On?
When the AC is turned on, it places an extra load on the engine. The compressor cycles on which draws engine power.
This extra load requires more fuel to maintain smooth operation. A clogged EGR will prevent proper fueling.
The ECU detects the extra load from the AC and instructs the fuel injectors to deliver more fuel to compensate. But the clogged EGR is allowing less air in, creating an overly rich fuel mixture.
This overly rich mixture causes misfires and erratic engine behavior as the extra fuel cannot combust properly.
When AC Is On, a Clogged EGR Can Cause:
- Stumbling, unstable idle as combustion suffers from excess EGR flow
- Surging or oscillating RPM as the computer struggles to find proper fuel trim
- Complete engine stall in severe cases where EGR flow chokes the engine
- Diminished power and acceleration due to poor combustion
How to test?
Remove the EGR valve and perform a visual inspection to check for any cracks or holes in the housing. A cracked or damaged EGR valve will need to be replaced.
To check if the EGR valve is working correctly, we will now use a hand-operated vacuum pump.
If the EGR valve can hold a vacuum, it indicates that the valve is functioning properly. However, if the vacuum pressure drops off after a while, it suggests a faulty EGR valve that needs to be replaced.
How to fix?
The EGR valve can get clogged over time, but thankfully it can be cleaned right in your driveway.
- Start by grabbing a can of carburetor cleaner from the auto parts store.
- Simply spray the cleaner directly into the EGR valve opening and you’ll see black gunk start to drain out. This crud is carbon buildup that restricts proper valve function.
- Give it a good soaking and make sure the valve is closed completely when finished cleaning.
- Next, inspect the tiny feed and inlet holes on the EGR valve to see if they are blocked. Here’s a handy trick: Take an old speedometer cable and gently insert it into each hole to check for obstructions. If the feed hole is clear, exhaust gases should flow through fine. But, the inlet side tends to collect more debris, so focus efforts there.
- To clear out the inlet, attach that speedometer cable to a power drill. Carefully spin the cable to “roto-root” out any stuck bits, restoring airflow. Verify the clogs are gone by using compressed air to blow into one end of the valve and ensure it rushes out the other side.
- Before bolting the cleaned EGR valve back on, apply some WD-40 into the inlet hole and let it soak for 30 minutes or so. This lubricates the valve stem and prevents future sticking. Just like that, your EGR system will be refreshed and running like new again.
9. Worn Engine or Transmission Mounts Cause Engine Jerk Under Load
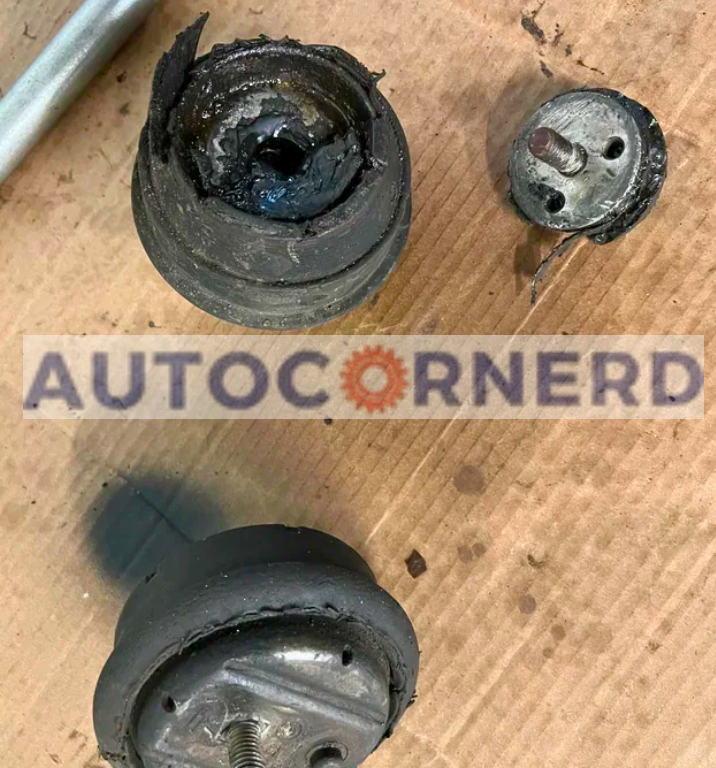
Engine mounts, also called motor mounts, are brackets that secure the engine to the vehicle frame or chassis. They are typically made of rubber or a combination of rubber and metal.
The rubber provides cushioning to dampen vibrations from the engine. Transmission mounts serve the same purpose for the transmission.
Mounts locate the engine and transmission precisely while allowing some movement from engine torque and road shocks. This prevents excessive vibration noise and harmonics from reaching the cabin. Mounts must withstand tremendous loads while providing proper vibration isolation.
When worn engine or transmission mounts are present, drivers are most likely to notice driveability issues when the air conditioning system is engaged. This is because the AC compressor places additional load on the engine.
With bad mounts, the extra torque and vibration from the AC kicking on can be transferred to the chassis instead of being dampened. This manifests as:
- RPM surge or dip when AC engages: The abrupt change in engine load is not smoothed out.
- Stalling: AC load combined with engine movement can stall engine.
- Sputtering: Extra vibration exacerbates any existing fuel delivery problems.
- Shake/vibration: AC torque amplifies vibration transfer through bad mounts.
- Rattle from components: Bad mounts allow more engine movement to transfer energy to components.
What Causes Mounts to Go Bad?
There are several reasons mounts can deteriorate and fail over time:
- Age and mileage: The rubber compounds degrade over years of exposure to road salt, weather, engine heat cycles, dirt, and oil contamination. The rubber loses elasticity and cracks or tears.
- Damage from accidents or potholes: Major jolts can bend or tear mounts.
- Oil contamination: Leaks allow motor oil to degrade the rubber.
- Improper torque on mounting bolts: This stresses the components.
How to test them?
The engine mount test checks if the mounts connecting the engine and transmission to the vehicle frame are worn out. Bad mounts allow excessive engine movement and put extra stress on other components.
Follow these steps to check the mounts yourself:
- First, have a helper get in the driver’s seat while you watch the engine. Ask him to keep the foot on the gas pedal while shifting between park, drive, and reverse. Make sure that parking brake is engaged.
- Focus on any engine rocking or bouncing during the shifts. If the engine moves a lot, the mounts are probably worn out. Healthy mounts keep everything stable.
Still not sure? Do a test drive to double-check. Listen close for odd noises or vibrations, especially over bumps. Excess motion points to mount problems again.
10. Malfunctioning Oxygen Sensor Provides Inaccurate Fuel Trims For Operation With AC Load
The oxygen sensor, also known as O2 sensor, is located in the exhaust stream. It generates a voltage based on the amount of oxygen detected in the exhaust gases. This voltage signal is fed to the engine computer.
The computer uses this data to constantly adjust the air-fuel mixture to maintain the ideal ratio for efficient combustion – around 14.7:1. This ratio helps maximize power and fuel economy while minimizing emissions.
If the exhaust oxygen content is high, it means the mixture is running too lean. The computer will respond by adding more fuel. Low oxygen indicates a rich mixture, so it will cut back on fuel. This feedback loop allows real-time fuel trim adjustments.
Why Oxygen Sensors Fail?
Oxygen sensors are subjected to high temperatures and harsh operating conditions. Some common reasons they fail include:
- Age and accumulated mileage which leads to thermal degradation of the internal sensing element
- Oil contamination from leaks
- Damage or improper installation of the sensor itself
- Failed wiring or connector issues that disrupt the sensor signal
What happens when you turn on AC?
When an oxygen sensor starts to fail, symptoms may only appear when the vehicle is under increased load, like when the AC compressor cycles on. This is because the extra demand taxes the ability of the compromised oxygen sensor to maintain proper fuel control. Signs can include:
- Intermittent shaking, hesitation, or misfiring when the AC engages: This is from the engine struggling to run optimally with a faulty air-fuel mixture signal.
- Surging or oscillating RPM when idling with AC on: The sensor cannot maintain steady fuel trim.
- Stalling: Severely lean or rich spikes from a malfunctioning sensor can stall the engine when AC is demanding extra power.
How to test bad Oxygen sensor?
The oxygen sensor creates power that goes up and down as the air and fuel mix changes. This power should always be moving between high and low.
If the oxygen sensor stops making the power go up and down correctly, the engine won’t run its best.
For the oxygen sensor to work right, the power needs to change at least one time every two seconds. It should go between 850mV and 150mV.
If the oxygen sensor’s power gets stuck in one place, or jumps too high or too low, the sensor is broken.
To test the oxygen sensor, connect the positive wire on a voltmeter to the signal wire from the oxygen sensor. If there are two wires on the oxygen sensor, connect the negative voltmeter wire to the sensor’s negative wire.
Final Thoughts
In summary, cars that feels bogged down or struggles to maintain idle when the AC turns on often have an underlying issue made worse by the extra load. This points to a few likely culprits.
The idle air control valve could be faulty. This small device helps control idle speed. A bad one may fail to compensate when the AC compressor cycles on, causing a stall.
Ignition components like spark plugs, wires or coils can also be weak links. Their job is to generate spark for combustion. But with deficient parts, the extra AC load can push them over the edge into misfiring.
Low refrigerant is another possibility. Not enough refrigerant makes the AC work harder to cool. The increased drag taxes the engine, sometimes causing trembling when engaged. A clogged EGR valve is similar.
It restricts proper exhaust flow, reducing available power. That leaves less headroom when the AC kicks on. Finally, a dirty throttle body can also limit air intake. Choking airflow hinders power delivery and hesitates the engine.
Some First Hand Experiences Shared By Users In Different Communities
Our team conducted research across various online communities, forums, and subreddits to gather user comments and opinions on “car jolts when ac is in use”.
User 1 says:
I experienced unstable RPM in my 2015 Kia Sorento when the AC was on. The cause was quite unique – a faulty engine mount. The additional vibration caused by the AC’s load made the problem evident. It was unusual because engine mounts aren’t directly related to the AC system. Replacing the engine mount fixed the sputtering, and the car runs smoothly now, both with and without the AC.
User 2 says:
My 2019 Mitsubishi Outlander had an issue where it would shake when the AC was turned on. After some diagnostic work, I found out that the serpentine belt, which drives the AC compressor, was worn out and slipping. This slip caused the shaking as the compressor struggled to operate effectively.
User 3 says:
My 2018 Honda CR-V started jerking when I used the AC. It was puzzling at first, but after some research, I discovered the issue was with the AC clutch relay. This relay was failing to engage and disengage the AC compressor properly, leading to intermittent vibration. After replacing the AC clutch relay, the problem was completely resolved.
User 4 says:
In my 2013 Volkswagen Jetta, I noticed sputtering when the AC was on. The issue was traced back to a malfunctioning throttle body. It wasn’t responding correctly to the increased load from the AC, causing the engine to hesitate. Cleaning and recalibrating the throttle body solved the problem, and the car now handles the AC load without any issues.
User 5 says:
My 2011 Dodge Charger had a strange issue where it would jerk only when the AC was on. After some investigation, I discovered the problem was a leak in the vacuum system. This leak was causing the engine to run lean, especially when the AC put additional load on the engine. Fixing the vacuum leak resolved the sputtering, and the car now runs perfectly with the AC on.
User 6 says:
I own a 2017 Hyundai Tucson, and it started stumbling when the AC was activated. Initially, I thought it was an engine issue, but after some inspection, I found the AC condenser was clogged with debris. This blockage was causing the AC system to work harder, putting strain on the engine. After cleaning the condenser and removing all the debris, the vibration stopped. It was a simple fix but a vital lesson in regular maintenance.

